Telescopes
Page 3 - Accessories
by Larry McNishPage last updated May 4, 2007
|
Telescope Accessories For basic information on Telescopes - go to Page 1. For more information on Telescope Mounting Systems - go to Page 2. For more Technical Information on Telescopes - go to Page 4. For more information on Star Diagonals and Barlow Lenses - go to Page 5. Eyepiece Diagonal TELRAD® Finder Other Accessories to consider for your telescope:
Eyepiece Diagonal 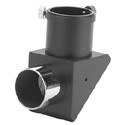 What it does: An eyepiece diagonal lets you view objects at a 90° angle from the direction the telescope is pointing, instead of looking "straight through", thereby allowing comfortable viewing. It can be used at any time, but is especially required when the telescope is pointed at, or near, the zenith (i.e. directly overhead). It does not provide any additional magnification itself, but it usually increases the focal length of the telescope slightly which causes a slight magnification gain. Mounting: It fastens to the back of the telescope in the eyepiece holder and contains a flat front-surface mirror that reflects the image at a 90° angle to an eyepiece in its own eyepiece holder. Alignment: None required. Use: An eyepiece diagonal is typically used on Refractor and Schmidt Cassegrain telescopes. It is not usually necessary for Newtonian and Dobsonian scopes where the secondary mirror already reflects the image at a 90° angle through the side of the telescope tube for comfortable viewing. If the eyepiece in the diagonal is pointing "up", the resulting image is right side up, but will still be reversed from left to right. If the diagonal is rotated so that the eyepiece is pointing to the side, then the resulting image is correct left-to-right but is upside down. This is because the angle of the mirror flips only one direction. Options: Different sizes are available - 0.96 inch for small scopes, 1 1/4 inch for intermediate scopes and 2 inch for intermediate and larger scopes. There are also diagonals that reflect the light 45°. For more information on Star Diagonals and Barlow Lenses - go to Page 5. ^ top TELRAD® Finder 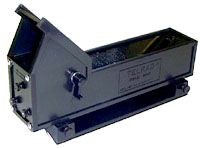
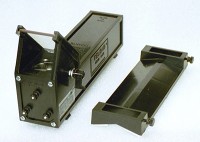
What it does: To see objects properly, a telescope must be pointed to exactly the right spot on the sky. A Telrad is what is called a reflex sight - a non-magnifying, non-inverting night sight for pointing telescopes to that "right spot". When you look through a Telrad's glass window "from the back" (i.e. from the triangular end) you see the sky exactly the way the star charts show it (not a small upside-down and magnified portion of it, but the "real sky"). Due to the Telrad's unique design, superimposed on the view of the sky are three red lighted target rings which appear to float on the view of the sky - sort of like a fighter pilot's "heads-up display". The largest ring is 4° across - it outlines the area typically covered by a finderscope. The middle ring is 2° across - about 4 times the diameter of the moon. The smallest ring is 1/2° across - it outlines the area typically seen in the telescope eyepiece. Mounting: On a Newtonian or Dobsonian telescope, a Telrad would be mounted up at the open end of the tube, near the eyepiece. On a Refractor or a Schmidt Cassegrain telescope it would be mounted at the back (again, near the eyepiece). Ensure you mount the Telrad so that you can comfortably look through it as you move your telescope around - without standing on your head! Alignment: The Telrad must be aligned with your telescope the same way your finder scope must be aligned. To align the Telrad, the base must be parallel to the telescope's optical axis. If it is not centered along the line of sight of the telescope, objects will be off-centre or missing from the field of view of the telescope. Carefully peel off the double sided-tape and mount the base to the scope (you may want to draw a temporary line along the telescope's optical axis to assist in this step). Then, use the finderscope and telescope to centre an object. This can be done in the daytime using a distant stationary object as a target. Once the object is centered in the eyepiece of the telescope, adjust the small thumb screws on the back of the Telrad to align the red circles on the same object. Use: Select an object on a sky chart (a star or planet etc.) and note its position among the visible stars. Note - it must be bright enough to be seen with the unaided eye - the Telrad does not provide light gathering power or magnification. Then look through the Telrad and move the telescope in Right Ascension and/or Declination until the Telrad rings are centered on that spot in the sky. A quick rough setting will put the object in the field of your finderscope. With no finder, or a faint object that won't show up in a finderscope, move the telescope carefully so that the smallest circle in the Telrad is centered on the object. This can put the object in the field of view of the telescope. The Telrad has a brightness control for the red rings so that they won't "wash out" any faint object you are looking for. Options: There are a few optional items available for the Telrad - additional mounting bases if you have more than one telescope, dew shields, led-blinkers and so on. Specifications: The Telrad is 8 inches long and weighs 11 ounces. It is battery operated from its own internal pair of AA cells. Slide the long flat "top" cover off the Telrad in the forward direction to access the battery compartment. It mounts on any telescope without drilling holes by having a base assembly that sticks onto the scope using double-sided tape. The Telrad unlocks from its base by loosening two side screws for separate storage. 
|