RASC Calgary Centre - Polar Alignment
Polar Alignment
by Jason Nishyama
Page last updated November 5, 2018
If you're just looking through your telescope at objects in the night sky, accurate polar
alignment is not required. In fact a simple non-equatorial mount will do just fine as long as you
don't mind nudging the telescope every couple of minutes. To look at an object for more than a
couple of minutes, your telescope will of course have to track the object.
Now modern alt-azimuth mounted goto telescopes can track an object just fine (as long as you avoid
the zenith, where the math makes tracking nigh-impossible) which is great for simple visual
observing, but not for astrophotography. Why? Field rotation. This is the apparent rotation of
stars around the centre of the view of your eyepiece as the telescope tracks an object across the
sky. This can be seen if one looks at the orientation of a constellation, such as Orion, as it
rises, at the meridian and again as it sets.
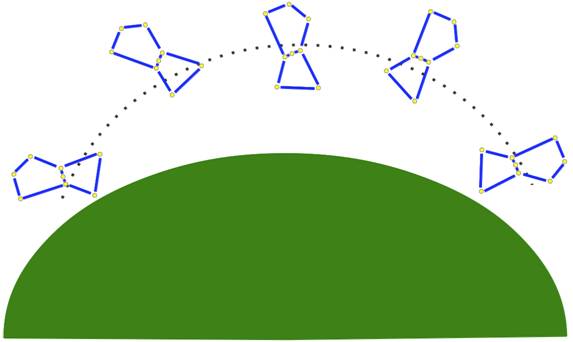
As can be seen in the graphic above, Orion appears to rotate 180 degrees from it's rise to it's
setting. Though this is useful in radio astronomy (this rotation forms the basis of aperture
synthesis) it poses a problem for optical astrophotography. The solution is a properly polar
aligned equatorial mount. For most of us this means either a German equatorial mount of some form
or a wedge mounted fork.
Accurate polar alignment is key to great astrophotography. If a telescope is not accurately polar
aligned, field rotation will appear along the edges of the frame even in properly guided images.
There are a couple of methods to ensure accurate polar alignment, the method I'll show here is the
most accurate, though also the most tedious. This method is the drift method.
You will need:
- An equatorial mount of some kind.
- Telescope.
- Reticle eyepiece.
Reticle eyepieces are ones with lines or cross-hairs (often illuminated) in the field of view.
They are very useful not just for polar alignment but also for centring objects for photography.
If you're a regular reader of this column, various observing project also use a reticle eyepiece.
They are generally not very expensive and are worth the investment.
Step one is to set up your tripod. It is important that when you do this the top of the tripod is
level. Though it is possible to polar align a non-level tripod, it is considerably more difficult
so the simple expedience of levelling the tripod at the start will save much frustration later. Of
course if you have a permanently mounted pier, it is important that the adaptor plate that the
mount is attached to is also level for the same reasons. If a particular point of the tripod
should be pointing north, put it pointing north.
Once your tripod is level, attach the mount and roughly polar align it. For a wedge mounted fork,
set the telescope to look parallel to the forks and by moving the wedge up and down and left and
right point the telescope at Polaris then lock the wedge. For German equatorial mounts sight
through the polar axis (this is usually hollow on GE mounts) until you can see Polaris as you
adjust the altitude and azimuth of the mount.
At this point the mount is roughly polar aligned and would be good enough for visual observing.
Now we need to make the alignment more accurate. If you have a polar alignment 'scope or your
mount has a polar alignment routine in it's goto electronics use it now. Though this won't align
the mount well enough for long exposure astrophotography, it will allow for short (~60 second)
exposures and if you intend to do longer exposures will save time during the drift testing.
Now for the drift testing. Pop your reticle eyepiece into your telescope and then point the
telescope at a reasonably bright star that is near the meridian at about 10 degrees declination
(anywhere between 0 and 20 degrees declination will do). The first step is to figure out which way
is east and west in your eyepiece. This is simple enough to do as turning off the tracking (or
pressing the west slow motion control) will cause the star to drift to the west in the eyepiece.
At this point you will want to rotate the reticle so that one set of lines runs east-west as in
the diagram below:

Now figure out which way is north in your eyepiece by either pushing your telescope gently to the
north in declination only or by using the north button on the slow motion controls of the
telescope. Note which way the star moves. For purposes of this article we will assume that north
is down and west is to the left (upside down and backwards). You will need to change the
instructions for the actual directions in your own telescope. I found the easiest thing to do is
to work out the directions as "up" and "down" and "left" and "right" in the eyepiece for a
particular telescope/eyepiece combination and then make a card with the up/down, left, right
adjustments on it. That saves trying to remember north/south, east/west and which way to move
what.
Line the star up with the east/west reticle line then wait a minute or so. If the star drifts up
or down you will need to adjust the azimuth of the wedge/EQ mount. If the star drifts right to
left, that's just the periodic error in the mount and can be ignored for now. It is important to
note at this time that you can't have any auto-guiding on while you do this as the auto-guider
will prevent the star from moving at all (if it's working properly).
With our north/down, west/left orientation, if the star drifts north (down) you will need to move
the azimuth so that the star appears to move east (right) as in the following diagram:

Of course you'll need to adjust which way to move the azimuth depending on which way is north/east
in your eyepiece. Of course if the star drifts south (up) you'll have to move the azimuth west
(left) instead.
Continue this until there's no drift off the line for at least 5 minutes. You can go for a longer
period of time if you'd like an even more precise alignment, though this is generally only needed
if you're permanently mounting the telescope (or are a stickler for precision).
Once you've got the azimuth aligned, time for the altitude. Find a star about 10 degrees above the
western horizon in the same declination rage as the first star (0-20 degrees). Compared to the
azimuth, the altitude is fairly straight forward. Line the star up on the east-west reticle line
then wait. If the star drifts up, adjust the altitude so that the star appears to move down in the
eyepiece. Conversely if the star appears to drift down, adjust the altitude so that it appears to
move up in the eyepiece. Again do this until the star doesn't drift off the line for at least 5
minutes.
If you're truly a stickler for precision (or are mounting the telescope permanently) you can then
go back and tweak the azimuth. Then go back and tweak the altitude and so on until you get the
precision you want (or tire of the effort). If your tripod is not level, you'll have to do this
back and forth bit several times.
At this point you're ready to go! Your telescope is now accurately polar aligned and can be used
to take long exposure astrophotos. Remember that though now there won't be any field rotation,
there will still be periodic error from the mount so manual or auto guiding will still be
necessary.
It should also be mentioned that if you're in the southern hemisphere, you'll have to reverse
south for north and east for west.
Clear skies!
|

