RASC Calgary Centre - Imaging the Sky 1
Imaging the Sky 1
by Jason Nishyama
Page last updated November 5, 2018
Imaging the sky
This is the first of a three part series of articles on astro-imaging. The purpose of these
articles is to give you the reader some insight into the world of astro-imaging, especially for
those who have no experience with the topic. In this article I will look at the often bewildering
range of imagers available on the market and the pros and cons of each. Next month will look at
how to take astro-images and the third article will be on how to process those images to make the
final produce.
Back in a time way longer ago than I care to admit I tried my hand at astrophotography using my
35mm film SLR camera. After taking some science images for university I then tried out some
"pretty picture" type shots. All were rather disappointing so I left astrophotography and
concentrated on the radio part of the spectrum.
Fast forward a couple of decades. I purchased my first Digital SLR several years ago for
terrestrial photography however one night on a whim I hooked the DSLR onto the WCO's C-14 and took
some short (1-2) minute shots of some bright deep sky objects. The results were amazing. Though
not John Myrtle amazing, they were good enough for me to want to continue so I did. Using my DSLR
I took many, many shots and a few years later when I purchased a higher end DSLR with a more
sensitive sensor I continued to do so. Eventually I ended up purchasing a purpose built
astronomical imager for school and now use this for most of my astro-imaging.
Enough about me. Now there are three basic styles of digital imager that amateurs use to image
objects in the night sky, I will avoid a discussion on film imaging for reasons that will become
clear later. First is the Digital Single Lens Reflex (DSLR) camera. These are simply terrestrial
cameras that one can purchase for taking your holiday snaps, that are then used to image objects
in the sky. Next are the purpose built astro-imagers that are commercially available. Finally
there are the web-cam type imagers, usually marketed as solar system or planetary imagers. These
are based on the same technology as the small cameras usually hooked up to computers to allow
video chatting.
All three of these use one of two types of sensor, either a charge-coupled device (CCD) or a CMOS
sensor. Both sensors detect light in a similar manner in that each chip has an array of
microscopic "wells" that when a photon of light hits one of the wells, an electron is forced out
of the chip and stored in the well. The wells are then read, the electrons counted and the wells
with a larger count of electrons are assigned a larger brightness value. Each well then makes up a
pixel in the final image. The difference between a CCD and a CMOS sensor is the way the
information in the wells is read out. The CCD, being an older design, shifts each row of wells to
a readout row which is then itself shifted one well at a time through an analogue to digital (A-D)
converter to count the electrons in each well. This is a bit of a time consuming process and
reading data from large CCD can take several seconds. CMOS sensors on the other hand have tiny A-D
converters attached to each well and thus read the entire chip more or less simultaneously. This
tends to make cameras that use CMOS imagers less expensive and smaller than those with CCDs as
less off chip electronics are needed to read out the information. The down side of CMOS sensors is
that since the electronics on both CCD and CMOS sensors are in front of the wells and hence block
some of the incoming light, CMOS sensors are somewhat less efficient at capturing light than CCD
sensors. In fact many professional observatories use special CCD's that have had most of the
silicon substrate that makes up the sensor removed so that light can get to the wells from the
back side, avoiding being blocked by the electronics. These back illuminated CCD's are very
efficient at collecting light but are also very expensive.
Now a quick look at sensitivity in general. The primary measure of how sensitive a device (film,
imager or the human eye) is known as quantum efficiency, expressed as a percentage. The higher the
percentage, the more light is being detected by the device. So a device that has a quantum
efficiency of 60% basically records 60 of every 100 photons that hit it and would be more
sensitive than a device that is only say 10% quantum efficient. Earlier I said I wouldn't look at
film and here's the reason why: the very best film designed for astronomical purposes has a
quantum efficiency of about 10%. The worst CCD and CMOS imagers available today have efficiencies
between 45% and 60% making modern electronic sensors way more efficient at detecting light. Some
back illuminated CCDs used by professionals have quantum efficiencies in the 98% range so are very
sensitive to light. For comparison the human eye has a quantum efficiency of about 3%.
So which sensor type should you use? CCD's are preferred by the professional community since they
have higher quantum efficiencies and only one A-D converter to correct for. That being said, for
most general amateur purposes either will work fine, especially at the beginner level. Purpose
built astro-imagers will generally use CCD's whereas web-cam and DSLR imager will use either, with
CMOS being more predominant in newer models.
Web-cam Imagers
Web-cam type imagers are popular imagers due to their price. Most can be had for less than $100
and are fairly straight forward to use. They are small and light so they don't cause weight
problems on a telescope. They work well at imaging bright objects such as the Moon and planets and
hence are usually marketed as solar system or planetary imagers. Though they work well at this,
their sensors tend to be smaller than those found in the other imagers and they also have limited
ability for exposures longer than a minute or so making them less useful for dim deep sky
objects.
DSLR's
In recent years the DSLR has become quite common. This replacement to the film SLR has become
popular with terrestrial photographers due to the higher picture quality available to a DSLR over
other types of digital camera along with the versatility of the design. DSLR's generally have
large image sensors and so can cover large areas of the sky than can other imagers in the same
price range. DSLR's with a "B" (bulb) setting can be used to make long exposures of several
minutes, allowing the imaging of fainter objects. DSLR's can range in price from $350 to several
thousand dollars depending on features and manufacturer. There are a couple of disadvantages to
using a DSLR in astro-imaging though, both due to the fact that they are optimized for terrestrial
imaging.
First is the low range of brightness values most DSLR's output in their image files. Due to the
restrictions of most computer screens the data values available in each colour (red, green and
blue) are 8 bits wide, that is can have a value between 0 and 255. This is despite the camera
itself having 14 bit values (0 to 16384) coming from it's sensor. This lowers the dynamic range of
the image and makes performing science from the image more difficult.
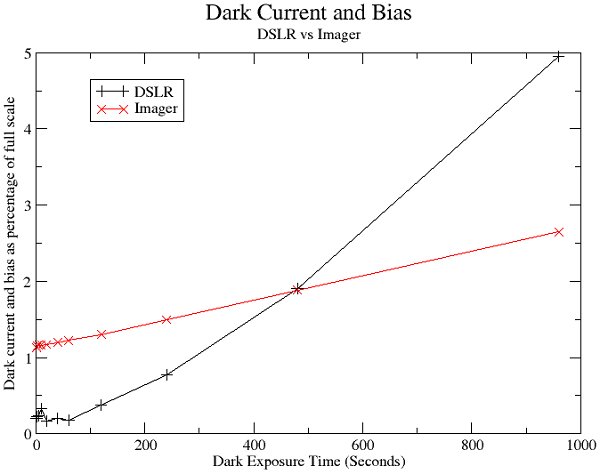
Second is that though capable of long exposures, DSLR's aren't really optimised for them. The
longer exposure you ask of a DSLR, the more noise becomes apparent in the final image. If you look
at Figure 1, the amount of noise for the DSLR (black line) jumps considerable after 60 seconds of
exposure. Prior to 60 seconds the software in the camera keeps a handle on the amount of noise
which is why prior to this the dark noise is fairly flat. Compare this to the noise in the
astro-imager where the amount of noise slowly rises over the same amount of exposure (both cameras
were operated at ambient temperature). In fact the dark noise of the imager is actually less than
what is suggested in the graph as there is a bias offset that the DSLR accounts for that the raw
output of the astro-imager doesn't eliminate.
Astro-imagers
Finally purpose built astro-imagers. These imagers are designed with long exposures of dark
objects in mind. The manufacturers of these devices usually select models of CCD chip that have
low noise and high quantum efficiency. The price of these devices can vary from a few hundred
dollars to tens of thousands depending on features. Most come with some form of cooling which is
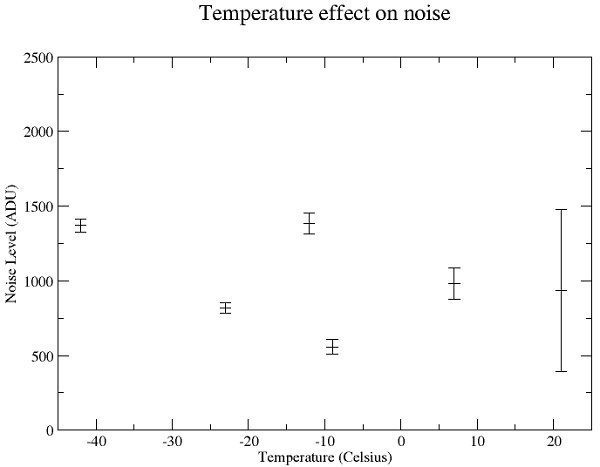
important in reducing dark noise. Looking at Figure 2 you can see the noise of an imager compared
to the temperature the imager was cooled to. Though the actual A-D converter value of noise is
roughly similar as temperature drops, the range that noise takes drops dramatically with
temperature (the bars in the Figure represent the standard deviation of the noise). Warmer chips
suffer from more noise than cooler ones. The method of cooling varies with cheaper devices cooling
to about 30 degrees below ambient temperature and more expensive devices cooling to around -40
degrees Celsius. The pros use liquid nitrogen to cool their CCD's to -100 degrees Celsius which
virtually eliminates dark noise.
When buying a purpose built astro-imager there's also a choice between monochrome and one-shot
colour imagers. Monochrome imagers are just that, the provide a black and white image. To make a
colour image one needs to take three images through red, green and blue filters and combine them
to get a colour image. One-shot colour imagers on the other hand have the filters built into the
chip so one image is all that is needed to make a colour image.
Which is better? Depends on what you want to do. If all you want to do is take the occasional
image of one object or another, the one shot colour imager will do just fine. They're easy to use
and set up and less time at the telescope is needed for results. If you want to do more serious
imaging or science, a monochrome imager is best. This is because to do very serious imaging or
science you may need to use filters that don't use the standard red, green and blue of colour
imaging. In these cases the built in filters of the one-shot imager get in the way. For example
let us say you want to image a nebula with an H-alpha filter. This filter sees a very small
portion of the red part of the spectrum generated by a transition in hydrogen atoms. With a one
shot colour imager, 75% of the pixels on the chip would not capture light as the blue and green
filtered pixels wouldn't see the red light from the H-alpha line. Only the red filtered pixels
would see it (it's 75% loss since there are two green pixels to every blue and red pixel on
"colour" sensors). A monochrome sensor on the other hand doesn't have any filters over its pixels
so every pixel will respond to the filtered light. So if you intend to do much scientific imaging
or use speciality filters, you're best to go with a monochrome imager.
So what to buy?
Now armed with the pros and cons of each imager, what should you get? My thoughts are if you are
just getting started in astro-imaging I would recommend a mid-range DSLR for a couple of reasons.
First they are fairly easy to use. Their controls are straightforward and they produce decent
single shot colour images right off the get go. This saves a lot of the frustration that can come
from more purpose built astro-imagers. The second reason is that if after a few nights of standing
in the cold you decide that astro-imaging isn't for you, then you've got several hundred dollars
invested in a camera that can be used to take your holiday snaps. The purpose built astro-imagers
just aren't suited to terrestrial photography. Then if after using a DSLR for awhile you want to
progress from the pretty picture phase of astro-imaging, you can then look at a purpose built
imager.
Imaging 2 - using that camera/imager to take some astrophotos.
|

